Showing posts with label article. Show all posts

Tuesday, October 20, 2009

Toy Camera Day

I missed this?!?!


I think I'll need to purchase a mini starter kit, just because it might be kinda cool to have!!!

Monday, July 13, 2009

Showit's Free Website

Of course, right after I buy my new website, a new FREE one comes out! I saw this today on Jasmine Star’s blog and it looks really great. These are the great people over at Showit. I think I might download it anyway and see how well this looks. Maybe I will do a switch when my other site expires!


Wednesday, July 1, 2009

100 STEPS TO IYP – Post Processing

So here we are, back after a long gap. For this lesson of the IYP series, we focus on a very important aspect of photography - Post Processing.Post processing is an important part of photography. If you don’t agree, I would request you through this post and the comments that follow. I’m sure you’ll understand what I’m saying.Now the good part is that there are plenty of tools available for basic post processing of pictures, and everyone has some tool or the other. You can use free software like GIMP and even Picasa to make basic edits. And of course there’s Photoshop. I use Photoshop for all my post processing.

In this tut, I won’t tell you how to post process pictures. I’ll focus on a general workflow and what to do and what not to do.

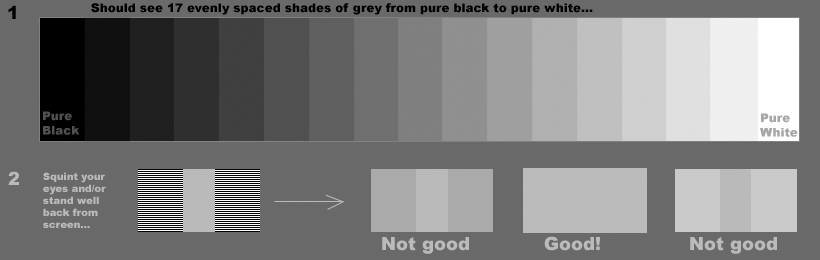
1. Calibrate your monitor. The colours that you’re seeing on your monitor may appear different in prints. This is because your monitor is not calibrated properly, and you may not see most of the detail in the shadow that is actually there. You will obviously process your picture accordingly, and the print (or the result on a calibrated monitor) will appear over-processed. And these days, with most people using LCD monitors, the viewing angle also plays a role here. You don’t need anything fancy to calibrate your monitor. You can use simple brightness and contrast to get reasonably good calibration. You can use the picture below to calibrate your monitor. Click on it to get the larger version, and use that. The smaller one is pretty much useless.


2. First step - Straightening and cropping: The first thing you should do is straightening any tilts and slants in your image. Many good images are spoilt by a simple tilted horizon. Not good. Simply rotate your image until you get the horizon straight. If you want, you can use a grid to match, but it generally isn’t needed.Next comes cropping. Empty space, distracting objects in corners and on edges, and other similar stuff can be easily cropped out. This way you can fill the frame as well, which in many cases enhances the picture. Cropping can help improve composition to quite an extent.

3. Brightness and contrast: This is the next step. If you’re using Photoshop, use the levels tool to adjust these. What you need to be careful about here is losing detail in shadows and highlights. Too much brightness will blow out the highlights and too much contrast will render the shadows too dark. Simply keep an eye on these when making adjustments, thats all. You can also use the shadows/highlights tool in Photoshop to get retrieve some detail from shadows.

4. Colour correction/saturation: Come to this after the adjusting the brightness and contrast. Another common mistake is made here by oversaturation. I’ve seen many people (including myself) who saturate the colours to such an extent that it spoils the image rather than correct it. Of course, the need varies from picture to picture, but generally, a small amount of saturation should do it.Colour balance can be corrected in Photoshop using the Image>Adjustments menu, like brightness and contrast. If there is a tint of yellow or blue or whatever, play around with the colour sliders to decrease that specific colour.

5. Noise reduction: I would recommend you use a dedicated noise removal software/photoshop plugin for removing noise. I use Neat Image, and find it very effective. You can also use softwares like Noise Ninja or Imagenomic Noiseware. These work better than Photoshop’s inbuilt noise removal, and allow you to sharpen images as well, but I would suggest you leave the sharpening for the end.

6. Sharpening: The last, and often the trickiest part of image processing. Sharpening should be done at the end. For me, Unsharp Mask in photoshop works best. No technicals here either. Play around carefully, and you’ll get what you need. Just know that too much sharpening can leave halos around the edges, making the image look oversharpened.

These steps are in the order I generally follow, and have found that it works well for me.I know that pictures would help here, and I’m sorry for not being able to post examples. I’ll be adding them soon however. And we’ll also be putting up more and specific articles on post processing. Notice that I’ve left out RAW processing here. That will be covered in a different post. For now, play around and try and get an idea about what I’m saying. This is the second last post of the IYP series. There’s only one more post to go. I hope you enjoyed the series.

Friday, June 26, 2009

Sharing Shooting Information

If you are wanting tofind the EXIF data (information like shutterspeed, aperture, ISO, lens used, camera used,exposure compensation, etc.) for an image onthe internet, you can:

1. click on the image
2. copy the URL
3. paste the URL on http://regex.info/exif.cgi

And it will give you all of the information solong as the photographer has not blocked their EXIF data from being viewed.

Tuesday, June 2, 2009

The importance of focus and quick tips on how to get it right

Focus in photography is about a lot more than simply sharpness or being able to see what you are looking at. Focus can enhance a subject by making it stand out from or blend into its surroundings, focus can draw you in, and the right focus can create an emotional connection with the viewer. No matter what style of photography you enjoy, focus can work for you or against you.

Portraits
The number one rule when shooting portraits of people or animals is this: focus on the eyes. (There are always exceptions—like all rules. But really, focus on the eyes.) By virtue of millions of years of evolution, human beings are hard-wired to very quickly recognize and respond to faces. (It’s definitely an important survival trait in my family to recognize when someone is angry at you, for example.)

Sure, you could focus on the tip of the nose or the ears if you like (which might work really well in some dog photos…) but nothing draws in a viewer to a portrait like sharply focused eyes and a blurred background.

How do you do it? Use a large aperture (f/2.8 or lower if possible), longish focal length (50mm and up), and get as close as you can.

Landscapes/architectural
Landscapes, photographs of nature or the environment around you, usually aim to capture as much of the view as sharply focused as possible. The idea is to give the viewer a sense of size, of scale. A buffet of sights, a feast for the eyes. Landscape photographers often avail themselves of a little knowledge of hyperfocal distances to keep everything in the scene in perfect focus, from the closest flower to the furthest cloud.

When everything in a photograph is in focus, the viewer’s eye is drawn first to important bold elements in the composition such as a strong line, large blocks of color, and rule of thirds intersection points. From there, the viewer wanders through the photograph like a virtual traveler, exploring every nook and cranny and taking everything in.
In the photo above, for instance, my eye goes first to the bottom of the trail and follows it up to the cloud and then over the rolling curve of the ridge to the blue sky above.
How do you do it? Use as small an aperture as you can (f/11 or higher), focus on something in the middle distance (or use the hyperfocal distance), and, if possible, use a tripod. Very tiny apertures (f/11, f/16, f/22) lead to longer shutter speed so tripods are often necessary for maximum sharpness.

Macros
Macros are the ultimate close-ups. Often focusing on a single, tiny subject, macros require special techniques and a lot of patience to get right. I don’t have any numbers to back this up, but I’d bet money that the rate of mental illness is higher among macro photographers than the rest of the photography population.

Macros are well-known for their ability to isolate and enlarge a single subject that often goes unnoticed to the naked eye. They’re also characterized by extremely shallow depths of field (sometimes just millimeters).

The shallow depth of field is usually a consequence of the very short working distances between the camera and the subject often required of macros (just inches). Counter-intuitively, with macro photography it is a constant struggle to increase the depth of field as much as possible so that the right amount of the subject is in focus.

How do you do it? Attach your favorite macro lens or use the macro mode on your camera, get as close as you can focus, and use the smallest aperture you can (f/8, f/11 or higher). Small apertures and close working distances sometimes mean low light as well so you may need to bring extra light, a tripod, and/or use a higher ISO setting.

Environmental portraits
These types of photographs are a blend of standard portraiture and landscape photography. The idea is that a portrait subject is shown in surroundings that tell the viewer something about that person. There are many different approaches to this type of photography but in general, since the person is primary subject, the person should always be in focus. Whether you keep the background in focus (and how much) depends a lot on the composition of the photo, whether the background is cluttered or clean, and how much emphasis you want to place on each (the subject vs. the environment).

Since these usually aren’t close-up portraits (head shots), focusing strictly on the eyes isn’t as important.

Thursday, May 21, 2009

Ten Ways to Improve Your Skills by Steve Paxton

Introduction to Digital Photography

The advent of high quality and inexpensive digital cameras has made it easier than ever to learn the basics of photography. The immediate feedback you get by being able to preview your images (via the LCD screen) in relationship to your exposure settings is invaluable. In the film days (not that long ago!), photographers had to take notes while in the field so that they could compare the results after the images were processed. It could take days or weeks before a film-photographer could process their images and examine their work. This could be sped up slightly if you had your own lab. Mistakes in exposure and lighting were expensive. New photographers breaking into the field faced these same challenges. Learning photography was usually a tedious and expensive endeavor.

What might have taken several days with film is now accomplished in minutes with digital images. Today, a young photographer can experiment with a new idea and see the results immediately. Want to learn more about timed exposures? Just setup your camera on a tripod and start cranking on the shutter speed. The camera automatically records your exposure settings so that you can examine and compare the results later when you get back to your computer. You can see what worked and what didn't almost immediately.

As a self-taught photographer, I began by taking pictures with a clunky, hand-me-down, 35mm camera over 15 years ago. I learned by reading books (with no easy access to the Internet then) and shooting lots and lots of photographs. I photographed just about everything I laid my eyes on. I spent nearly all of my discretionary income (which wasn't much!) on film and processing. Most of my images were pretty sad to look at; however I learned a lot about exposure and light. Nothing can take the place of honest-to-goodness experience. Getting out in the field and practicing, with whatever camera you have, is one of the fastest ways to master the fundamentals of exposure.

I get a regular stream of emails from new photographers asking for advice. There are thousands of books and even more websites providing advice for new photographers. Rather than writing an in-depth guide covering the basics elements of photography, I decided to share a few ideas to help point new photogs in the right direction. I recommend reading through this as a road map or guide rather than a tutorial. Near the end, I list a few of my favorite links that cover the essential aspects of photography. I also provide titles to several books that I highly recommend (most of which I own and have read several times). Let's get started!

Book Smarts Number One: It critical for new photographers to understand and become familiar with the delicate balance between aperture, shutter speed and ISO to obtain properly exposed photographs. In the age of automatic digital cameras, it is easy to skip over this and never fully understand what is happening behind the scenes. Take the time to learn how each element is interconnected and dependent on the others. Understanding the basic principles of exposure is the foundation of becoming a good photographer.

If you are just getting started, fill your mind with everything you can find on the basics of photography. In fact, I recommend reading through a few of the older (i.e. pre-digital) books on photography that were written prior the advent of Photoshop and digital DSLR cameras. There are many classic photography books still available at the library and used bookstores. The basic principles of photography still apply today. Understanding how traditional analog cameras and film work will give you a broader view of the field of photography.

When you are ready; get your hands on contemporary books on digital photography. Don't forget to scour the Internet for guides and tutorials - there are free resources available everywhere. Start bookmarking the ones you like and read through them at your own pace.
Consider Taking a Class Number Two: If you have time, consider enrolling in a basic photography class. Taking photography classes have a way of speeding up the learning curve. Most community colleges offer a variety of photography courses. Enrolling in a local class is also a great way to meet other photographers and develop a network of friends to learn with. There is nothing like having someone demonstrate and teach fundamental principles while also being available to answer questions. If time is a factor, another option is to work through an online class or watch Internet based learning videos. Although not as interactive as traditional classes, you can learn a great deal by watching experts demonstrate tried-and-true techniques. Check out the list of resources for online training at the end of this guide.

Nothing Takes the Place of Experience Number Three: Once you have a basic understanding of exposure and how your camera works, it's time get out in the field and snap some pictures. Just about any decent digital camera will do when you are just getting started. Many of today's digital point-and-shoot cameras allow you to shoot in manual mode. Set your camera to manual and start shooting. Play with the relationship between shutter speed, aperture and ISO. Shooting in manual mode should help reinforce everything you have been reading about. Try shooting in different lighting conditions and at different times of the day. Deliberately under and over expose your images and see how that changes things. Shoot into the sun. Shoot at night. Shoot in the rain. Shoot moving objects. Shoot inside and outside. Photograph your family and friends. Photograph landscapes. Photograph animals at the zoo. Deliberately experiment with ideas. When you are ready, import your images to a computer and review your work.
Photographing a variety of subjects has an added benefit of refining your interest in photography. Some photographers love shooting portraits while others prefer the solitude of landscapes. Over time, you will develop a sense for what type of photography appeals to you the most. It is important to focus your interest.

Don't Get Discouraged! Number Four: Try to be easy on yourself and not get discouraged. As a new photographer, I shot countless throwaway pictures (I am not kidding here!). I have boxes and boxes of photographs that will never see the light of day; however each and every image represents a different learning experience. The more experience you get, the better you will become. Remember that all serious photographers started in the same place you are now. Today's new photographers are fortunate as it's no longer necessary to shell out tons of money processing film to learn basic lessons. An inexpensive point-and-shoot camera and flash card are all that are necessary to get started.

Start a Journal - Record Your Thoughts and Ideas Number Five: Start a photography journal. Write down what works and what doesn't. Record new ideas and generally keep track of your progress. Take your journal with you so that you can capture your thoughts as they come. It used to be that you had to write down the exposure information about each image as you went (if you wanted to precisely keep track of exposure data). This was sometimes referred as a photo-log. Today, digital images contain metadata. Metadata is simply defined as data about data and pretty much replaces the photo-log. Metadata is saved with each photograph you take and contains ISO, shutter speed, f-stop, color space information and a myriad of other little details about each photograph you take. Use your journal to record your thoughts about composition, lighting, and anything else that comes to mind that might be relevant later. As you review your images, take note of the exposure settings (saved with each image) and write down what you think you can improve upon the next time you are out.

Start a Photoblog - Show Off Your Work Online Number Six: Consider starting a photoblog. Maintaining a regular photoblog is a great way to stay motivated while documenting your progress as a new photographer. Think of a photoblog as an online journal of your progress. Most photoblogs allow viewers to comment and critique your images. Constructive feedback can be a helpful way of discovering your strengths and weaknesses. It is also a wonderful way to network with other photographers around the globe. I have made many virtual friends in the photoblogging community through my own photoblog. Above all, a photoblog is a record of your growth as a photographer.

Add a DSLR to Your Arsenal Number Seven: At some point you're probably going to feel ready to jump into a more serious digital single lens reflex (DSLR) camera. It is easy to get mesmerized by all the high end photography gear and feel tempted to spend thousands of dollars. Don't lose sight of the bigger picture (no pun intended!) and get hung up on getting the latest, greatest setup. Find an affordable DSLR, one or two lenses and a tripod that you can grow into. Take a trip to Flickr and you will find thousands and thousands of stunning images produced with entry-level DSLR cameras. Remember it's not about the gear; it's about producing images. Stay focused on the art of image making.

Consider Interning Number Eight: Once you feel comfortable and are ready to take it to the next level, consider interning for a professional photographer. Hopefully by this time you have a general idea of what direction you want to go as a photographer. If you are interested in portrait photography, check with portrait photographers in your area and see if one of them will mentor you. My experience has been that most professional photographers are more than happy to help young people learn about the business. You will probably have to start out by carrying gear and lugging equipment around. Don't under estimate how valuable this can be. Watching how different professionals work should help you develop a photographic style that you are comfortable with. You will also learn quite a bit about dealing with people and business side of being a professional photographer.

Learn How to Process Your Work Number Nine: This is a big one. When I transitioned from film to shooting digital, I underestimated the importance of learning how to process my images on a computer. As a film photographer, my sole focus was producing the "perfect exposure" (for whatever look I was attempting to achieve). I took most of my film to a professional lab - they in turn charged me an arm and a leg to process. I never worried about the processing because my lab did an excellent job. As long as I exposed my images properly, I knew my lab would take care of the rest.

In the digital age of photography, processing is now done on a computer. Today's digital photographers shoot and process their work. It took me about a year to really grasp the significance of this as a new digital photographer. I couldn't figure out why my digital images seemed so flat and lifeless compared to my film photographs. As time went on, I slowly realized the significant role programs like Adobe Photoshop play in this new digital age.

I can't stress enough how critical it is to learn how to properly process your digital photographs. You don't have to become an expert at using Photoshop or Lightroom; however every digital photographer should take the time to learn the basics of non-destructive image processing and using layers. Some long-time film photographers are still struggling with this. It is tough to change and learn new ways of doing things. The Internet is loaded with free written and video guides on Photoshop and Lightroom. Books on Photoshop fill whole walls in big name bookstores. There is no excuse for not learning how to properly process your digital images. Just like learning about photography for the first time, it just takes time and practice.

Don't Take Photography Too Seriously (i.e. Have Fun!) Number Ten: Whether you are interested in pursuing it as a hobby or professionally, digital photography is a wonderful, creative outlet. Have fun with it. It is easy to get caught up in the "what's next.." and forget about the here and now. Whatever your skill set, remember to have fun and not to take things too seriously. Your skills will improve as time goes on - learning is a never ending process and your photographs will look better and better each time you take your camera out. I can't image myself without a camera. Hopefully some of these suggestions help point you in the right direction so that you can grow in the field of photography. Just remember to have fun!
Digital Photography Resources :: Fuel for Your Brain Below are some of the best online resources and books available to learn the basics of digital photography. Most of the links are geared toward beginner and intermediate level photographers and should wet your digital-photography-appetite. Books are arranged by date and category.

Tuesday, May 5, 2009

Focusing

I was looking for some focusing tips via Google the other day and I found this one to be of somewhat help. I will be trying it out.


Q: I noticed you have many photos of more than one subject/person. In each case, both people are perfectly focused. Is this optimized by having people close together so that the camera is focusing well in the middle of them? If you had two people who were not close together, is the best way to keep them both in focus going to be with lots of light that enables a smaller aperture/larger f-stop? What if you are indoors? Is lighting the key?


A:Depth of field (the range of an image that is acceptably sharp) at any distance is determined by a combination of focal length and aperture. Wide angle lenses and small apertures (f32, f22) give the greatest apparent DOF.However, the closer the subject is to the focal plane of the camera, the shallower the depth of field becomes. The final piece the puzzle is that the depth of field extends further beyond the true point of focus than it does in front of it... that means, in practice, if you want 2 objects to appear sharp, you should focus at a point past the nearest object 1/3 of the distance to the farthest, using the smallest aperture (largest f number) available at the shortest focal length suitable to fill the frame. Easy!

Tuesday, April 21, 2009

Scrapvilliage Forum

Krista sent me a link for a cool new forum/message board at Scrapvillage, called THe Photo Studio which talks about all things to do with Photography! There are weekend challenges, support, feedback and fun!!! Krista maintains it so this will need to be checked out!

http://www.scrapvillage.com/phpBB2/viewforum.php?f=37&sid=05763c165b9d735c03da3180abbdd684

Sunday, April 5, 2009

Tracking Photoshop History

Enter the history metadata. Note that this is different than the History Palette in Photoshop. The History Palette saves a limited number of snapshots of your image as you work it in Photoshop. You can click on a step to return to that editing point, but as soon as you close the image, the History is cleared to save memory. History metadata, on the other hand, tracks everything you do to an image, forever! You can't, however, return your image to that point in time, you can only see the details of what you did - which is often all you need.
Set the preference in Photoshop to save all your history to the image metadata.


From this point on, all information is saved with the file in the history metadata.
Now, to view this info for a future image, goto File, File Info...


In the File info dialog, click on History to see all the gory details! You'll notice that it names all the actions you've used too, which can be very helpful.


Friday, March 6, 2009

My Photography Workflow by Thomas Hawk

Probably the question that I get asked more than any other is about my photography workflow. I actually feel like my photography workflow is pretty simple so I thought I’d write up a brief post documenting my process all the way from photo capture to photo publishing. Feel free to ask any questions if you need me to elaborate on things.

1. Step one, capture the image: I carry my Canon 5D and 5 lenses (24mm, 14mm, 50mm, 135mm, 100mm macro) with me in a backpack every where I go. I take advantage of the routine time wasted in a day to turn that time into photography. Walking to and from the BART train. Going out for lunch. Waiting in line somewhere. All kinds of everyday moments become photographic opportunities.

Of course I also go out on specific photowalks all the time. Sometimes these are weekend trips away from home, other times they are just evenings out shooting with friends or with my wife. I use 2 8GB SanDisk cards.

To learn more about what is in my camera bag you can read this post here.2. Step two, transfer the image to the computer: Here I use a high speed USB card reader. All card readers are not created equal. Spend the extra few bucks and get a high speed reader. Every day or other day I use my card reader to offload images on my camera card to my computer. In my case when I plug in my card reader Canon’s “Camera Window” software automatically loads. This software then pulls all of my images off of my CF card and puts them into folders on my computer titled by date taken. After my images are transferred to my MacBook Pro I then put the card back in the camera and delete the images off of it. If I’m on an all day shoot I’ll take breaks during my day (coffee, lunnch, etc.) to take a moment and clear out my cards.Bonus Link: 13 Tips for Using and Caring for Memory Cards.
http://digital-photography-school.com/13-tips-for-using-and-caring-for-memory-cards

3. Step three, sort photos: Here I open the folder that has all of the RAW files from a given day’s images using Adobe’s Bridge software. I create a subfolder in the dated folder called “maybe.” I go through the day’s photographs and I drag anything that I think might have potential into the “maybe” folder.

4. Step four, first pass processing using Adobe Camera RAW: My next step is to open all images in a day’s maybe folder using Adobe Camera RAW (comes with both Photoshop CS3 and Lightroom). You simply select all of the images in your maybe folder, right click, and select “Open in Camera RAW.” This is where 95% of my photo processing is done.
With camera RAW you can adjust the contrast of a photo, the exposure of a photo, the saturation of a photo. You can adjust the temperature of a photo (the reason why some white lights are sulfur yellow and other white lights are soft blue), you can adjust the vignette (black or white edges around a photo), fill lighting, etc. Adobe Camera RAW uses sliders to make these adjustments and it is easy as pie.

After I get an individual image to where I want it I will use the “Save” button in camera RAW to save that finished photo as a JPG in a new folder “Finished Images.”
After I process my first pass imagery I move that date’s archive folder off my Mac and onto my drobo to back it up and store it more safely. Note, none of my RAW files are ever saved as processed. I consider my RAW files my negatives and always want to be able to go back to them and process from scratch if need be.

5. Step five, 2nd pass processing: Once I’ve finished my first pass processing I will point Bridge to the “finished images” folder. Here I will look at each finished JPG image in as large a format as possible looking for photos that need additional work. Typically less than 10% of my photos need additional work beyond camera RAW.

The type of work here is all done in Photoshop. As I go through the images I look for a few things consistently. Images that need slight sharpening. Images that have dust spots on them that need to be fixed with the cloning tool in Photoshop. Images that could benefit from dodging or burning, etc. As I see an image in Bridge that needs additional fine tuning I will double click on the image in Photoshop, make my edits, save the file and close it.

6. Step six, keywording: My next step is to keyword all of my photos using Adobe Bridge. Adobe Bridge has pretty powerful keywording capabilities. I can batch and bulk keyword photos. I might start out, for instance, keywording every single photo I just processed as “Las Vegas” “DMU Las Vegas Meetup 2008″ “Vegas”. From there I then might go through sub batches and keyword them (say Caeser’s or Wynn or Venetian). From there I might then bulk keyword certain frequently used attributes (neon, mannequin, graffiti, night, etc.). And then I go through each image individually adding any final keywords image by image.

Keywording is important because these keywords will be automatically read as tags by sites like Flickr and Zooomr. It also allows you better to search your finished imagery in the future on your computer. The Importance of Keywording Your Photos.

7. Step seven, geotagging: Here I use a free program called Geotagger. Geotagger works with Google Earth and allows you to pinpoint a spot on the planet using Google Earth and then drag and drop any images from that location onto the program and geotags them with that coordinate. Geotagger only works for the Mac but there are lots of other free geotagging programs like Geotagger out there that work with Windows. When you geotag your photos at the file level both Flickr and Zooomr automatically add them to the meta data on your photo and place them on their site maps.

8. Step eight, sort finished photos into A or B to be uploaded folders: My next step is to go through my imagery and basically sort 80/20. What I feel are my strongest 20% go into a folder “B.” The rest go into a folder “C.”9. Step nine, publish: I publish twice a day usually but this is by no means a hard and fast rule. Once in the morning and once in the evening. I typically publish 10-15 photos at a time selected mostly at random from my growing pool of “to be uploadeds.”
I make sure that when I upload these 10 or 15 shots in a batch that the “B” shots are uploaded last as Flickr and Zooomr only highlight the last 5 shots that you upload in an upload batch. I want these to be what I feel are my better images.

And that’s it. I’m sure that there are more efficient ways that I could be processing my imagery but this has worked for me for a while now. Feel free to ask any questions as the above might sound a bit complicated to some.

Sunday, January 25, 2009

13 Tips for Using and Caring for Memory Cards

How should I care for my digital camera’s memory card to make it last as long as possible?
Where there are many things that are unique from one digital camera to another - one thing unites us all (or most of us) - we all media cards to store our photos onto (the exception to this are a few cameras with lots of internal memory).

So how can you care for your memory card and get the best results from it?

Here are 13 tips for using and caring for Memory Cards (note - if you want advice on buying memory cards check out our post on Which Memory Card Should I Buy:

1. If Disaster Strikes - Stop Shooting
If you have a disaster and accidentally delete your images or see an card error message - stop using the memory card. All is not always lost when you have one of these problems and it may be that you can still recover your images - the key is to stop using the card or else you might overwrite your other images. Data recovery services or tools may be able to restore your images for you.

2. Delete Images on your Computer not In Camera
Deleting images from your card while the card is on your camera can actually prolong the life of your memory card. The rule is that the fewer times you add or remove data on your card the better. Erasing all your images at once after uploading them to your computer means one erase cycle rather than lots of them if you delete them one at a time on your camera.

3. Remove Cards Safely When Connected to Your Computer
After uploading images to your computer from a card make sure you follow the proper procedure to eject the card before removing it from your card reader. In OSX this means right clicking the drive assigned to your card and hitting ‘eject’. In Windows use the ’safely remove hardware’ option in your system tray to remove the card and the card reader).

4. Multiple Cards Can be Better than One
I learned this lesson on a recent trip when I had a memory card die on me mid trip. Having a second card handy meant that I was able to continue using my camera. It also means that if you do lose the data on one card, not all of your images from a shoot will be lost. Of course multiple cards can also mean problems too as there are more to keep track of - I’ve heard h3 arguments for both - but personally rotate through 3 cards at present.

5. Avoid Filling Your Cards Completely
I have a friend who recently had an issue with a memory card. When he took it into the store he bought it from for advice they asked if he’d completely filled the card with images. When he said he had they told him that this could occasionally cause problems with some types of cards. I’d not heard this before and am a little skeptical about it myself - but it’s probably worth keeping in mind. I guess the advice is to regularly take images off your cards rather than doing it just when they are full. This is common sense anyway as it stops the heartbreak of losing gigabytes of images if you lose a card/camera or have a card error with a three quarters full memory card.

6. Periodically Reformat Cards
Every now and again reformat your memory card. This will wipe any data, images, file names on the card and set it up afresh for your camera. Of course you should only do this AFTER you’ve downloaded any images on the card or you’ll lose them.

7. Format your Memory Card In the Camera You Want to Use it on
Formatting your memory card while in your camera will make sure that the card is set up and structured specifically for your camera. If you’re using someone else’s card in your camera (and they’ve used it on a camera with a different make) you can end up with issues that can be resolved by reformatting on your camera (just make sure you’ve got all the images that were on the card off it first as reformatting deletes all data on the card).

8. Switch Your Camera Off before Removing Memory Card
This was a tip that was given a lot a year or two ago for fear of cameras giving cards ‘voltage shock’ on removal of the card. Manufacturers seem to have made improvements in this area since then - although I can’t speak for all of them and I guess that it is better to be safe than sorry. Check your camera manual to see what they recommend.

9. Keep Your Camera Up to Date
Camera manufacturers will release firmware updates from time to time. These keep your camera up to date with any fixes for errors or problems that are identified with a camera. Some of these can relate to the camera’s interaction with the memory card.

10. Periodically Update Your Cards
While memory card life spans have increased significantly over the last few years - they do have a limited life and will need to be updated from time to time. With prices coming down this is fortunately a less and less expensive task.

11. Replace Batteries Before they Run Down
Keep an eye on the power level left in your camera’s batteries and either recharge them or change them over for a fresh set before they completely run down. This will stop your batteries running out halfway through writing an image to your card. This will stop you losing that last image but also can stop card errors that can occur when an image is not fully written to a card.

12. Don’t Switch Off Your Camera too Quickly after Shooting
This tip is for those of us who shoot in ‘burst’ or ‘continuous shooting’ mode. When shooting lots of images quickly a camera needs a little time to write all of the data you’ve taken to the memory card. If you’ve taken numerous images very quickly your camera will be ‘buffering’ images and if you switch it off during this process you’ll lose images and could even find yourself with a system error (note: some more modern cameras have fixed this problem and will now continue buffering after you switch them off).

13. Common Sense Maintenance
It should go without saying - but keep your cards dry and clean, don’t expose them to extreme temperatures, don’t drop, bend or puncture them and don’t expose them to h3 electro/magnetic currents. Storing cards that are not in use in a plastic casing (usually supplied with the card) can give it an extra layer of protection.

Bonus Tip - Prepare Your Card for Being Lost

One last tip from our archives. One fear that many digital photographers have is that they’d lose their camera and/or memory card. One tip that I heard a while ago now is to take a picture of your business card or luggage tag complete with your contact details and to keep it as the first image on each of your memory cards. Lock it so that it’s not deleted and hopefully if your camera or card is lost the person who picks it up will get in touch (if they’re honest). Read more: http://digital-photography-school.com/13-tips-for-using-and-caring-for-memory-cards#ixzz0Kno8D1Vg&C

Thursday, November 13, 2008

Put your name in your camera!

When travelling we tend to put our names and addresses on our suitcases and bags, but how do you do it for your camera?

You can obviously put them on your camera bag but what happens if you lose your camera or a memory card filled with precious images when your camera is not in the bag?
One suggestion that I read recently was that the first shot that you take on each memory card should be a shot of your luggage tag or business card complete with your contact details so that it has your name and contact details on it.

Similarly - I know of one photographer who has locked an image in his camera’s internal memory with his contact details. This image is never deleted as it’s locked and will be the first image anyone turning on his camera sees.

While many people would snaffle up your lost memory card (and the camera it was in if you happened to lose the whole camera) there are honest people in the world that have the technical ability and would get in touch with you.

Of course another (simpler) way might be to label your memory cards (and camera) with a sticker with your details on them. Many memory cards have a space to label them these days which could do the trick for you.

PS: of course you’ll want to put an image that people can read on your memory card/camera - unlike mine above :-)

Read more Read more: http://digital-photography-school.com/put-your-contact-details-in-your-camera#ixzz0KnoX76Ql&C

Tuesday, November 11, 2008

100 Things About Photography

1. Never do photography to become a rock-star.
2. Enjoy what you are shooting.
3. Prepare well for your shooting, realizing that your battery isn’t charge when you’re setting up for that sunrise shoot is too late!
4. Always take one warm garment more than you actually need with you
5. Pay attention to your thoughts and emotions while you are shooting
6. Set goals you can achieve
7. Write tips about photography, because writing is also learning
8. Never go shooting without a tripod
9. Be pleased with the little prosperities
10. Build relationships with potential photo buddies
11. Watch the place you want to shoot first with your heart then with the camera
12. Always stay calm
13. Know that you tend to overestimate yourself
14. Perspective is the killer
15. Dedicate yourself to photography, but never browbeat yourself too much
16. Take part in a photography community
17. Keep your camera clean
18. Never compare yourself to others in a better or worse context
19. Find your own style of photography
20. Try to compose more and to hit the shutter less
21. Seek out and learn to accept critique on your images
22. Do something different to recover creativity
23. Get inspiration from the work of other photographers
24. Criticize honestly but respectfully
25. Get feedback from your lady
26. Don’t copy other photographer’s style
27. Be bold28. Take care of the golden ratio
29. 10mm rocks!
30. Take selfportraits
31. Read books about photography
32. To give a landscapephotograph the extra boost, integrate a person (maybe yourself)
33. Every shooting situation is different than you expect
34. Pay attention to s-curves and lines
35. Always shoot in RAW
36. Keep your sensor clean, so you can save some work cleaning your image in post production
37. Discover the things you think are beautiful
38. It takes time to become a good photographer
39. The best equipment is that what you have now
40. You can’t take photographs of everything
41. Break the rules of photography knowingly, but not your camera ;)
42. Pay attention to the different way that light falls on different parts of your scene
43. The eye moves to the point of contrast
44. Clouds increase the atmosphere of a landscape
45. Start a photoblog46. Accept praise and say “thank you”
47. ‘Nice Shot’ is not a very useful comment to write
48. ‘Amazing!’ isn’t useful either. Try to describe specifically what you like or don’t like about an image.
49. You are not your camera
50. Ask a question at the end of your comment on a photo to get a ping-pong conversation with the photographer
51. Do a review of your archives on a regular basis, the longer you photograph - the more diamonds are hidden there
52. Always clarify what the eyecatcher (focal point) will be in your image
53. No image is better than a bad one
54. Everyone has to start little
55. Your opinion about photography is important!
56. Leave a funny but thoughtful comment
57. Speak about your experiences with your photo buddies
58. Limit your photograph to the substance
59. Participate in Photocontests60. Post processing = Optimizing your image to the best result61. Shoot exposure latitudes as often as possible62. Use photomatix as seldom as possible, HDR’s always have a synthetic flavor
63. Always remember what brought you to photography
64. Never shoot a person who doensn’t want to be photographed
65. Always turn arround, sometimes the better image is behind you
66. It’s who’s behind the camera, not the camera
67. Mistakes are allowed! The more mistakes you make, the more you learn!68. If you have an idea and immediately you think : No, this is not going to work - Do it anyway. When in doubt - always shoot.
69. Understand and look to your histogramm while shooting. It delivers very important information about your image
70. Know your camera, because searching the menu button in the night is time you don’t want to waste
71. Shoot as often as possible
72. Believe in yourself
73. Don’t be afraid of getting dirty
74. Pay attention to qualitiy in your image
75. Your photographs are a personal map of your psyche
76. Re-check your ISO-Settings. It’s aweful to detect the wrong settings on your screen.
77. Be thankful for long and thoughtful comments on your images
78. Never trust your LCD. Normally it is brighter and sharper as the original image.
79. Provide for enough disc space, because it’s cheap and you will need it.
80. Learn to enjoy beautful moments when you don’t have a camera with you.81. Always arrive at least half an hour earlier before sunrise / sundown, composing in a hurry is a bad thing.
82. Try to amplify your mental and physical limits. Takes some extra shots when you think “it’s enough”
83. Pay attention to structures in the sky and wait until they fit into structures in the foreground
84. Visit the same place as often as possible. Light never shows the same mountain.
85. Print your images in big size. You will love it.
86. Calibrate your monitor. Working with a monitor that is not accurate is like being together with someone you can’t trust. It always ends badly.
87. Don’t think about what others may say about your image. If you like it, it’s worth publishing.
88. Never address reproaches to yourself. Learn from your mistakes and look forward, not backward.
89. Fight your laziness ! Creativitiy comes after discipline.
90. Ask yourself : What do you want to express in your images ?
91. Always try to think outside the box, collect new ideas about photographs you could do and ask yourself : Why not?
92. Search for a mentor.
93. Photography is never a waste of time.
94. Every community has it’s downsides. Don’t leave it out of an emotional response.
95. There will always be people who will not like what you are doing.
96. Henri Cartier-Bresson was right when he said that “Your first 10,000 photographs are your worst.”
97. A better camera doesn’t guarantee better images.
98. Always have printing in mind when you postprocess your images.
99. Photography is fair : You gain publicity with the quality of your images. Unless the images are stolen, there is no way of cheating yourself higher.
100. Write a 100 things list